Decadent Hawaiian Guava Cake Recipe
Introduction
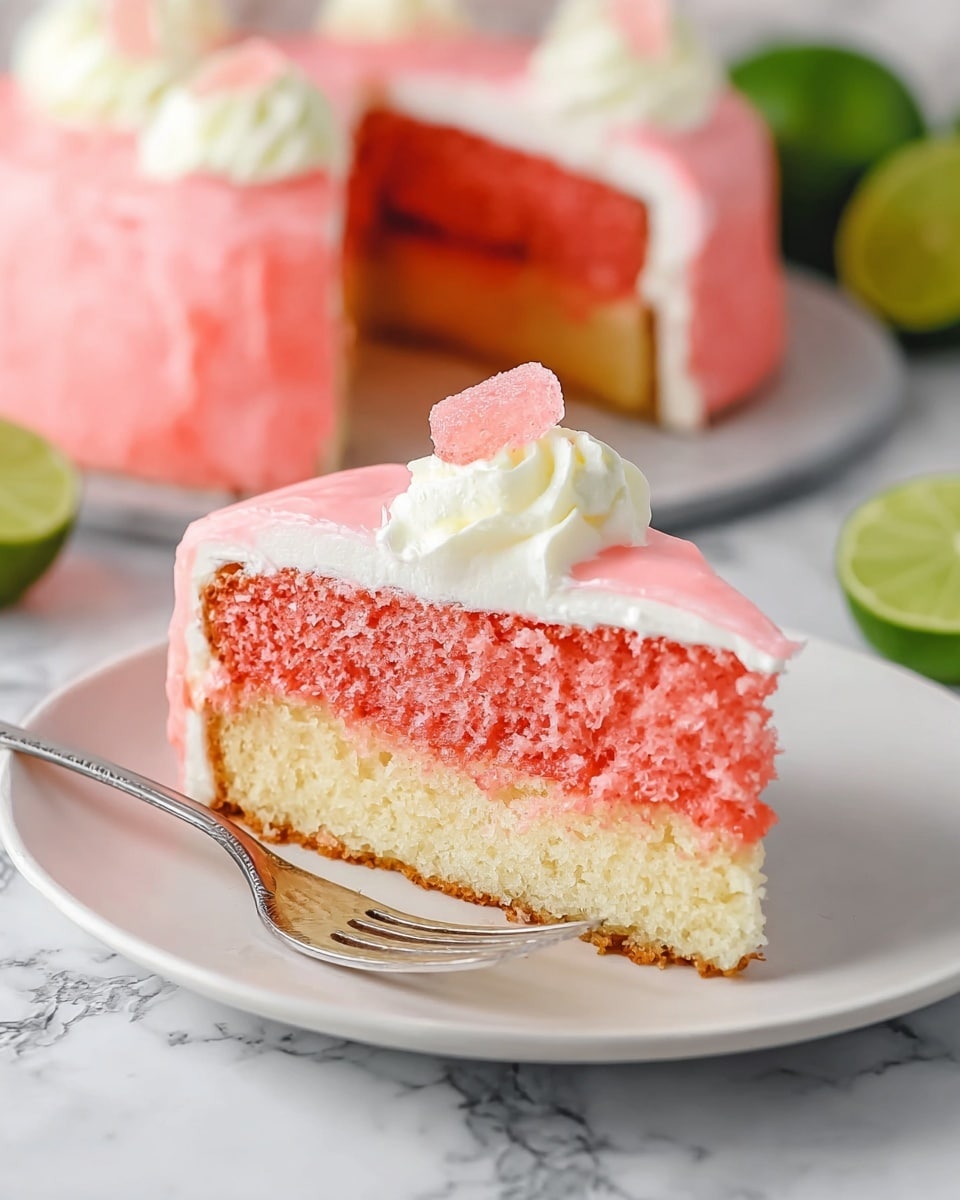
This Decadent Hawaiian Guava Cake combines tropical flavors with a light, creamy texture. Featuring guava juice and sweet coconut, it’s a refreshing dessert perfect for any occasion. Simple to prepare yet impressive to serve, this cake brings a taste of the islands to your table.
Ingredients
- 1 box Strawberry Cake Mix
- 1 cup Guava Nectar or Guava Juice (for batter)
- 3 large Eggs (room temperature)
- 1/2 cup Coconut Oil (melted)
- 8 oz Cream Cheese (room temperature)
- 1/2 cup Granulated Sugar
- 1 tsp Vanilla Extract
- 8 oz Cool Whip (thawed)
- 2 1/2 cups Guava Nectar or Guava Juice (for glaze)
- 1/2 cup Granulated Sugar
- 2 tbsp Cornstarch
- 1/4 cup Water (for slurry)
- 1 cup Sweetened Coconut Flakes (for garnish)
Instructions
- Step 1: Preheat the oven to 350°F and coat a 13 x 9-inch baking dish with vegetable spray.
- Step 2: In a mixer, combine the strawberry cake mix, 1 cup guava nectar or juice, eggs, and melted coconut oil. Mix on low for 30 seconds, scrape the sides, then beat on medium-high for 2 minutes.
- Step 3: Pour the batter into the prepared pan and bake for 24–26 minutes. Test doneness with a toothpick; it should come out clean.
- Step 4: Transfer the cake to a wire rack and let it cool completely.
- Step 5: Beat the cream cheese until fluffy. Add 1/2 cup sugar and vanilla extract, then fold in the thawed Cool Whip. Refrigerate this mixture until ready to use.
- Step 6: Once the cake is cooled, spread the cream cheese mixture evenly over the top and chill to set.
- Step 7: For the glaze, combine 2 1/2 cups guava nectar or juice with 1/2 cup sugar in a saucepan and bring to a low boil.
- Step 8: In a small bowl, mix cornstarch and water to make a slurry. Whisk this into the boiling guava mixture and cook for one minute until thickened. Remove from heat and let cool in the refrigerator.
- Step 9: Spread the cooled guava glaze evenly over the cream cheese layer.
- Step 10: Refrigerate the finished cake until serving, then garnish with sweetened coconut flakes if desired.
Tips & Variations
- Use coconut oil for a subtle tropical flavor or substitute with vegetable oil if preferred.
- For a dairy-free version, try coconut cream instead of cream cheese and a dairy-free whipped topping.
- Chilling the cake overnight helps the flavors meld beautifully and makes slicing easier.
- Add chopped macadamia nuts to the cream cheese layer for extra crunch and island flair.
Storage
Store leftover cake covered in the refrigerator for up to 3 days. Keep it chilled to maintain the glaze and cream cheese frosting’s texture. When reheating, it’s best served cold, but you can let it sit at room temperature for 15 minutes before serving for a softer bite.
How to Serve

Serve this delicious recipe with your favorite sides.
FAQs
Can I use fresh guava juice instead of store-bought nectar?
Yes, fresh guava juice works well and can add a more natural flavor. Just ensure it’s strained and sweetened to taste, as fresh juice can vary in sweetness and consistency.
Is it possible to make this cake gluten-free?
You can use a gluten-free strawberry cake mix to make this recipe gluten-free. Be sure to check all other ingredients, like the Cool Whip and guava nectar, for any gluten-containing additives.
PrintDecadent Hawaiian Guava Cake Recipe

This Decadent Hawaiian Guava Cake combines a strawberry-flavored cake base with luscious guava nectar, creamy sweetened cream cheese topping, and a glossy guava glaze, all finished with a tropical sprinkle of sweetened coconut flakes for a truly island-inspired dessert.
- Prep Time: 15 minutes
- Cook Time: 26 minutes
- Total Time: 1 hour 15 minutes
- Yield: 12 servings 1x
- Category: Dessert
- Method: Baking
- Cuisine: Hawaiian
- Diet: Vegetarian
Ingredients
Cake Batter
- 1 box Strawberry Cake Mix
- 1 cup Guava Nectar or Guava Juice (for batter)
- 3 large Eggs (room temperature)
- 1/2 cup Coconut Oil (melted)
Cream Cheese Topping
- 8 oz Cream Cheese (room temperature)
- 1/2 cup Granulated Sugar
- 1 tsp Vanilla Extract
- 8 oz Cool Whip (thawed)
Guava Glaze
- 2 1/2 cups Guava Nectar or Guava Juice
- 1/2 cup Granulated Sugar
- 2 tbsp Cornstarch
- 1/4 cup Water (for slurry)
Garnish
- 1 cup Sweetened Coconut Flakes
Instructions
- Preheat and Prepare Pan: Preheat your oven to 350°F (175°C). Grease a 13 x 9-inch baking dish with vegetable spray to prevent sticking.
- Make Cake Batter: In a mixer bowl, combine the strawberry cake mix, 1 cup of guava nectar, eggs, and melted coconut oil. Mix on low speed for 30 seconds, then scrape down the sides and beat on medium-high speed for 2 minutes until smooth and well blended.
- Bake Cake: Pour the batter evenly into the prepared baking dish. Place in the oven and bake for 24 to 26 minutes. Test doneness by inserting a toothpick in the center; it should come out clean.
- Cool Cake: Remove the cake from the oven and transfer it to a wire rack. Allow it to cool completely before proceeding.
- Prepare Cream Cheese Topping: Beat the cream cheese in a mixing bowl until fluffy. Gradually add in the sugar and vanilla extract, beating until combined. Gently fold in the thawed Cool Whip to create a light, creamy mixture. Refrigerate until ready to use.
- Frost Cake: Once the cake has cooled completely, spread the cream cheese mixture evenly over the top. Place the cake in the refrigerator to set.
- Make Guava Glaze: In a saucepan, bring 2 1/2 cups of guava nectar and 1/2 cup sugar to a gentle boil over medium heat. In a small bowl, whisk together cornstarch and water to form a slurry. Slowly whisk the slurry into the boiling guava mixture.
- Thicken Glaze: Continue boiling the guava mixture for 1 minute, stirring constantly, until it thickens into a glaze. Remove from heat and let cool completely in the refrigerator.
- Glaze Cake: Once cooled, spread the guava glaze evenly over the cream cheese layer atop the cake.
- Chill and Garnish: Refrigerate the glazed cake until ready to serve. Just before serving, sprinkle the top with sweetened coconut flakes for added texture and tropical flavor.
Notes
- Ensure all refrigerated ingredients like eggs and cream cheese are at room temperature for smooth mixing.
- Check the cake around 24 minutes to avoid overbaking; toothpick should come out clean but moist.
- The guava glaze must be cooled before spreading to prevent melting the cream cheese layer.
- Use high-quality guava nectar or juice for the best tropical flavor.
- This cake should be served chilled and stored in the refrigerator to maintain freshness.
Keywords: Hawaiian guava cake, strawberry cake, tropical dessert, guava glaze, cream cheese topping, coconut flakes, baked cake