Loaded Brownie Cheesecake Cups Recipe
Introduction
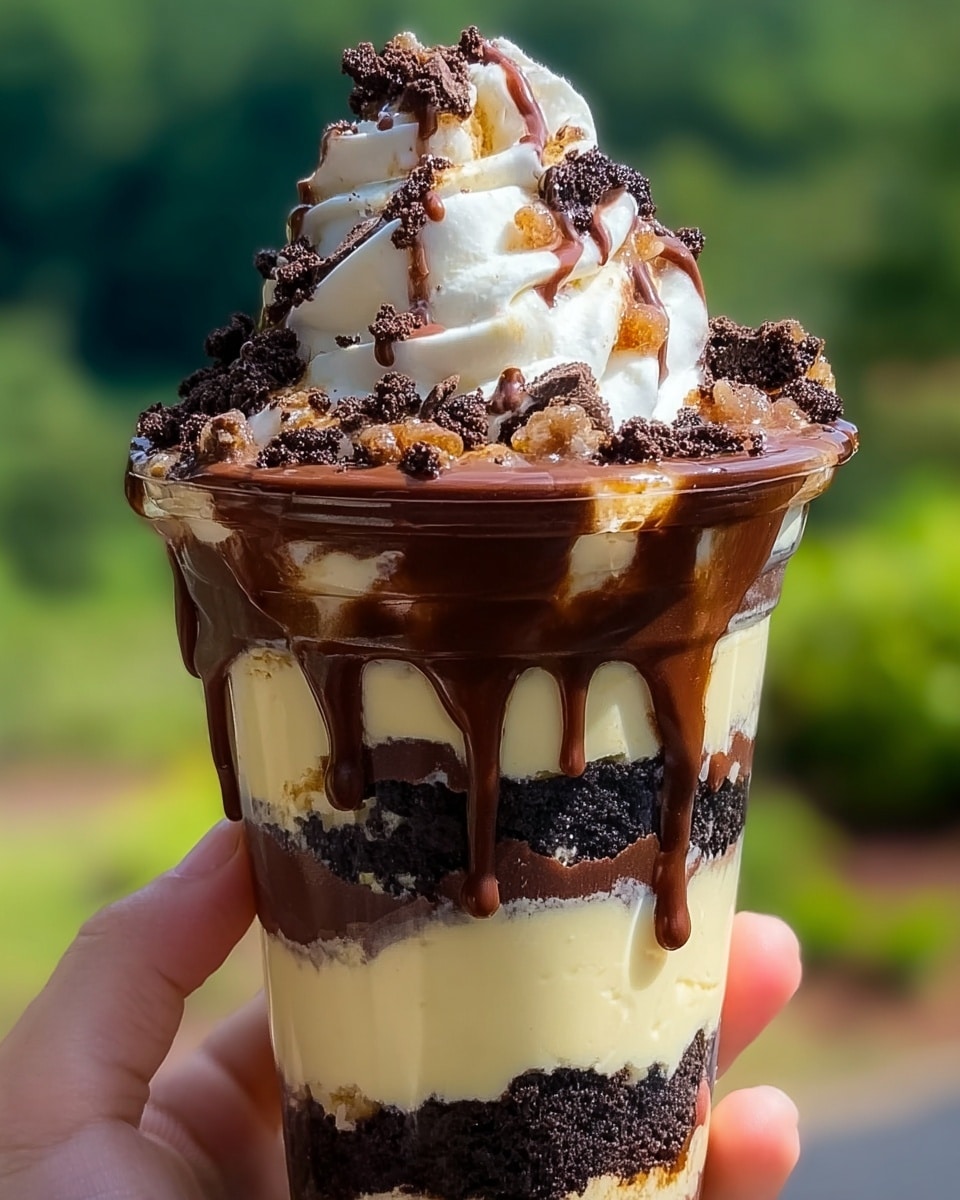
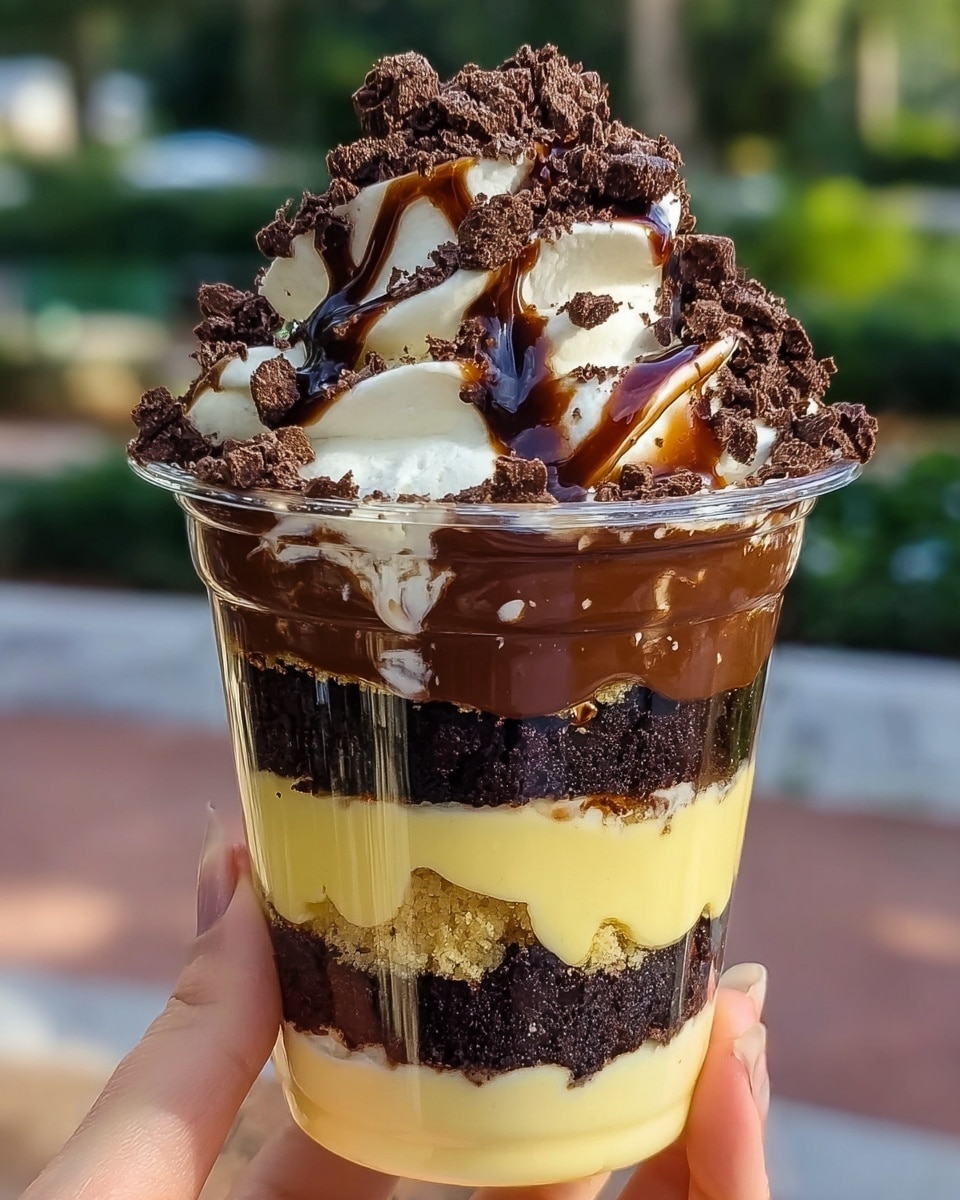
These Loaded Brownie Cheesecake Cups combine rich, fudgy brownies with a light and creamy cheesecake mousse for a decadent dessert experience. Perfect for entertaining or a special treat, they’re easy to assemble and sure to impress. Layers of chocolate ganache and caramel add indulgent finishing touches.
Ingredients
- 2 cups fudgy brownies, crumbled (homemade or store-bought)
- 1½ cups cream cheese, softened to room temperature
- ½ cup powdered sugar
- 1 teaspoon vanilla extract
- 1 cup heavy whipping cream, whipped to stiff peaks
- Chocolate ganache (melted chocolate + heavy cream)
- Caramel sauce (store-bought or homemade)
- Extra brownie crumbs for topping
Instructions
- Step 1: Make the cheesecake filling. In a mixing bowl, beat the softened cream cheese, powdered sugar, and vanilla extract until smooth and lump-free. In a separate bowl, whip the heavy cream to stiff peaks. Gently fold the whipped cream into the cream cheese mixture using upward motions to keep it light and airy.
- Step 2: Prepare the brownie layer by crumbling cooled brownies into bite-sized pieces. Avoid making the crumbs too fine to retain texture.
- Step 3: Assemble the cups. Start with a layer of brownie crumbs at the bottom of each serving vessel, pressing gently if you prefer a firmer base. Add a layer of cheesecake mousse on top and smooth it out. Drizzle chocolate ganache and caramel sauce over the mousse.
- Step 4: Repeat the brownie and cheesecake layers once more, then drizzle additional ganache and caramel on top. Finish with extra brownie crumbs and more drizzles of sauce. Optionally, add whipped cream, a mini brownie square, chocolate shavings, or a sprinkle of flaky sea salt.
- Step 5: Chill the cups in the refrigerator for at least 1 hour to let the flavors meld and the cheesecake firm up. Serve chilled.
Tips & Variations
- Use very cold heavy cream for whipping to achieve maximum volume in your cheesecake mousse.
- For added texture, incorporate chopped nuts or chocolate chips in the brownie layer.
- Swap caramel sauce for raspberry sauce or fresh berries for a fruity twist.
- To make ganache, melt equal parts chocolate and heavy cream together until smooth and glossy.
Storage
Store the assembled cups covered in the refrigerator for up to 3 days. Keep them chilled until ready to serve to maintain the mousse’s texture. If desired, let cups sit at room temperature for 10 minutes before serving for a softer bite. Leftover brownie crumbs and sauces can be stored separately in airtight containers for up to a week.
How to Serve
Serve this delicious recipe with your favorite sides.
FAQs
Can I make these dessert cups ahead of time?
Yes, you can assemble the cups a few hours or even a day in advance. Just cover them tightly and store in the refrigerator until serving.
What’s the best way to soften cream cheese quickly?
Leave the cream cheese out at room temperature for about 30 minutes, or microwave in short 10-second bursts until just soft but not melted.
PrintLoaded Brownie Cheesecake Cups Recipe

Loaded Brownie Cheesecake Cups are a decadent no-bake dessert combining rich fudgy brownie chunks with a light and airy cream cheese mousse, layered and topped with luscious chocolate ganache, caramel sauce, and extra brownie crumbs. Perfect for individual servings that offer a luscious blend of textures and flavors, this dessert is easy to assemble and ideal for impressing guests or indulging a sweet tooth.
- Prep Time: 20 minutes
- Cook Time: 0 minutes
- Total Time: 2 hours 20 minutes (includes chilling time)
- Yield: 6 cups 1x
- Category: Dessert
- Method: No-Cook
- Cuisine: American
Ingredients
Brownie Layer
- 2 cups fudgy brownies, crumbled (homemade or store-bought)
Cheesecake Filling
- 1½ cups cream cheese, softened to room temperature
- ½ cup powdered sugar
- 1 teaspoon vanilla extract
- 1 cup heavy whipping cream, whipped to stiff peaks
Toppings
- Chocolate ganache (melted chocolate + heavy cream)
- Caramel sauce (store-bought or homemade)
- Extra brownie crumbs
Instructions
- Make the Cheesecake Filling: Start with softened cream cheese to ensure smooth blending. In a mixing bowl, combine the cream cheese, powdered sugar, and vanilla extract. Beat until the mixture is silky and lump-free. This is the flavor base for your mousse. Next, whip the heavy cream in a separate bowl until stiff peaks form. Gently fold the whipped cream into the cream cheese mixture using a spatula. This folding process keeps the filling light and airy. Do not stir aggressively—use gentle, upward folds to maintain the mousse-like consistency. Tip: Make sure the cream is very cold before whipping for maximum volume.
- Prepare the Brownie Layer: Use either homemade or store-bought brownies. If using homemade, let them cool completely before crumbling. You want moist, dense brownie pieces, not dry crumbs. Crumble them into bite-sized chunks—not too fine, so you retain some texture.
- Assemble the Cups: Grab your serving vessels—glass dessert cups, small jars, or even plastic tumblers work beautifully. Layer 1: Brownies – Start by adding a layer of crumbled brownies at the bottom. Gently press down for a firmer base or leave them loose for a rustic texture. Layer 2: Cheesecake Mousse – Using a piping bag or a spoon, dollop the cheesecake mousse on top of the brownie layer. Smooth it out gently. Layer 3: Drizzles – Add a drizzle of chocolate ganache and caramel sauce. Repeat the brownie and cheesecake layers once more, followed by another generous drizzle of ganache and caramel.
- Top It Off: Sprinkle extra brownie crumbs on top for added texture and a rich, chocolatey bite. Drizzle additional ganache and caramel over the top. For an extra flourish, add whipped cream, a mini brownie square, or chocolate shavings. Optional: Sprinkle with flaky sea salt for a sweet-and-salty finish.
- Chill and Serve: Refrigerate the cups for at least 1 hour, preferably 2–4 hours, to allow the flavors to meld and the cheesecake to firm up. Serve chilled with a spoon.
Notes
- Use cold heavy cream for whipping to achieve maximum volume.
- Ensure brownies are fully cooled before crumbling to prevent sogginess.
- Handle the folding of whipped cream gently to keep the mousse light and airy.
- Refrigerate for 2–4 hours for best flavor melding and texture setting.
- Optional toppings like sea salt or chocolate shavings enhance flavor complexity.
Keywords: brownie cheesecake cups, no bake dessert, layered dessert, chocolate caramel cups, creamy cheesecake mousse