Oreo Cheesecake Cookie Cups Recipe
If you adore bite-sized treats that combine creamy indulgence with a crunchy, chocolatey base, then you are going to fall head over heels for these Oreo Cheesecake Cookie Cups. These delightful little cups capture everything that makes cheesecake so irresistible but in a fun, easy-to-eat form. Picture a buttery Oreo crust hugging a smooth and rich cream cheese filling, all topped with a cloud of whipped cream and an extra sprinkle of Oreo crumbs—pure bliss in every bite! Whether you are making them for a party, a cozy night in, or just because, these Oreo Cheesecake Cookie Cups will quickly become your new favorite dessert obsession.

Ingredients You’ll Need
Gathering these simple ingredients is the first step in creating Oreo Cheesecake Cookie Cups that are bursting with flavor and perfect texture. Each element plays a vital role, from the iconic Oreo cookies that form a crunchy crust to the creamy filling that provides that signature cheesecake tang.
- Oreo cookies (20): The foundation of each cup, crushed finely for a firm, chocolatey crust.
- Unsalted butter (5 tbsp, melted): Binds the Oreo crumbs together and adds a rich, buttery flavor to the crust.
- Cream cheese (8 oz, softened): The star of the filling, delivering that classic cheesecake creaminess.
- Granulated sugar (1/2 cup): Sweetens the filling perfectly without overpowering the tang.
- Sour cream (1/4 cup): Adds moisture and a subtle tang to balance the richness.
- Whipped cream (1 cup): For topping, turning each cup into a light, luscious dessert.
- Mini chocolate chips (optional, 1/4 cup): Stir these in for an extra chocolate surprise in the filling.
How to Make Oreo Cheesecake Cookie Cups
Step 1: Prepare the Crust
Start by preheating your oven to 350°F (175°C). Then, crush the Oreo cookies into fine crumbs—using a food processor or placing them in a sealed bag and pounding with a rolling pin works perfectly. Mix these crumbs with the melted butter until everything is evenly combined. This mixture will be the base of your cookie cups, crisp, chocolatey, and utterly delicious.
Step 2: Form the Cookie Bases
Line a muffin tin with cupcake liners for easy removal later, then press about one tablespoon of the Oreo mixture firmly into the bottom of each liner. Be sure to spread the crumbs evenly to create a sturdy base that will support the creamy filling without falling apart.
Step 3: Make the Cheesecake Filling
In a bowl, beat together the softened cream cheese and granulated sugar until the mixture is light and fluffy—that’s the secret to a silky smooth filling. Add the sour cream and mix just until smooth. If you want to add mini chocolate chips for a little extra texture and sweetness, fold them in gently now.
Step 4: Fill and Bake
Spoon the cheesecake filling over the Oreo crust in each liner, filling almost to the top. Bake the cups in the preheated oven for 15-18 minutes. You’ll want the centers to be set but with a slight jiggle, which means they are perfectly baked and will cool to a creamy, firm texture. After baking, allow them to cool completely before placing in the refrigerator to chill.
Step 5: Top and Serve
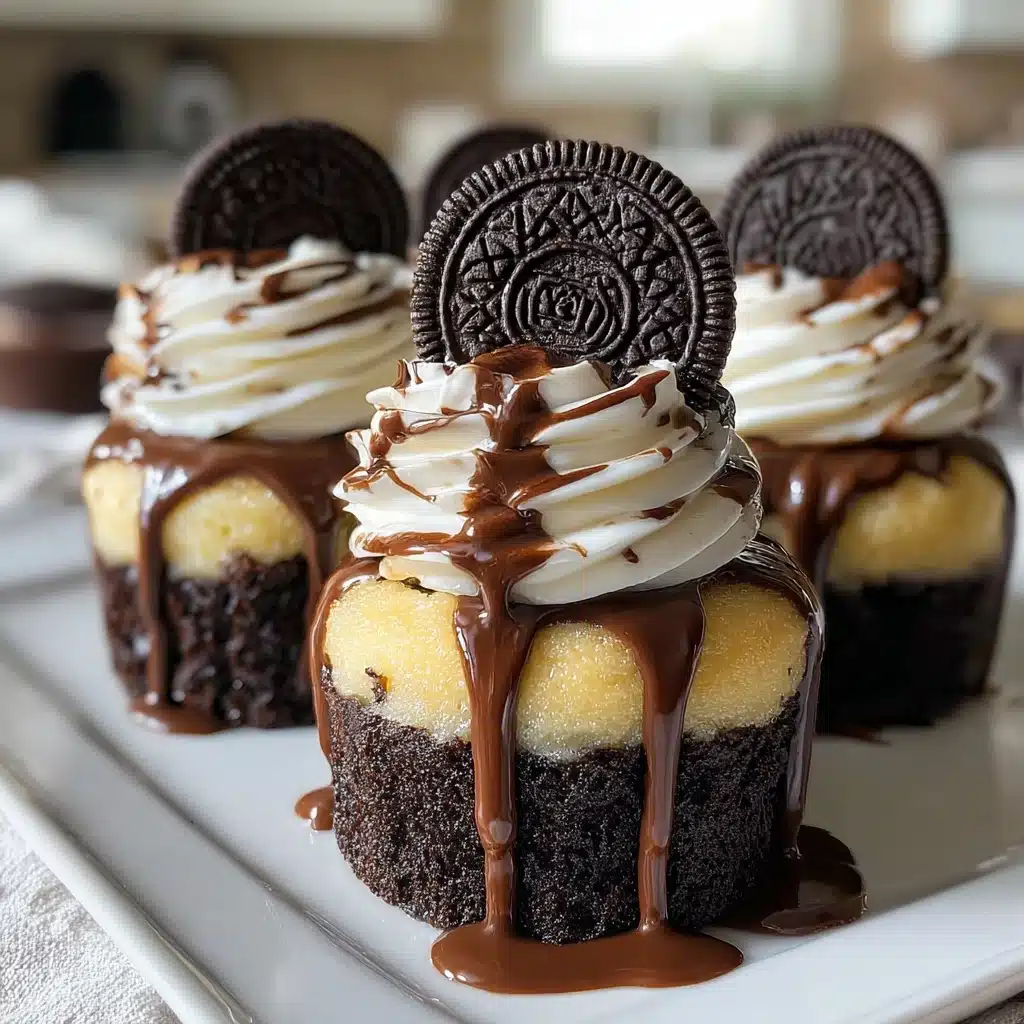
Once chilled, dollop each cup generously with whipped cream for a light, airy finish. Sprinkle crushed Oreos on top for a final touch of crunch and unmistakable Oreo flavor. Your Oreo Cheesecake Cookie Cups are now ready to be devoured!
How to Serve Oreo Cheesecake Cookie Cups
Garnishes
To elevate your Oreo Cheesecake Cookie Cups, consider fresh garnishes like a few chocolate shavings or a drizzle of caramel or chocolate sauce. A single mini Oreo or a fresh raspberry on top adds a pop of color and flavor that makes these cups feel extra special.
Side Dishes
These cookie cups pair perfectly with a cold glass of milk or a rich cup of hot coffee or espresso. For a brunch or dessert table, consider serving them alongside fresh fruit or a light berry compote to cut through the richness and provide balance on the palate.
Creative Ways to Present
Make these Oreo Cheesecake Cookie Cups the star of your next gathering by arranging them on a decorative platter or tiered stand. For a playful twist, serve them in transparent mini cups without liners so guests can see the delightful layers. You can also add edible flowers or dust them lightly with cocoa powder for a touch of elegance.
Make Ahead and Storage
Storing Leftovers
After you make these Oreo Cheesecake Cookie Cups, store any leftovers in an airtight container in the refrigerator. They will stay fresh and creamy for up to 3 days, making them an excellent make-ahead dessert for busy days.
Freezing
If you want to save some for later, these cookie cups freeze beautifully. Place them in a single layer on a baking sheet and freeze until solid, then transfer to a freezer bag or container. They can be frozen for up to 2 months. Thaw overnight in the fridge before serving and add fresh whipped cream as needed.
Reheating
Since these are cheesecake-based, reheating is not recommended because they are best enjoyed chilled. If you prefer them a bit softer, allow them to sit at room temperature for 15-20 minutes before serving to bring out the creaminess without warmth that could affect the texture.
FAQs
Can I use a different type of cookie for the crust?
Absolutely! While Oreo cookies create the classic flavor combination, you can experiment with other sandwich cookies or even chocolate chip cookies for a unique twist. Just make sure to crush them finely and mix well with the melted butter for a solid crust.
Is there an alternative to sour cream in the filling?
Yes, you can substitute sour cream with Greek yogurt or heavy cream, which will still provide moisture and a slight tang. Keep in mind that Greek yogurt will make the filling a bit healthier, while heavy cream keeps it rich and luscious.
Can these Oreo Cheesecake Cookie Cups be made vegan or dairy-free?
They can be adapted by using dairy-free cream cheese and a plant-based whipped topping, along with vegan butter. Make sure to pick Oreos that are certified vegan since not all sandwich cookies meet this criteria.
How do I prevent the crust from getting soggy?
Pressing the Oreo crumbs firmly in the liners and baking the filled cups until just set helps create a barrier so the crust stays crisp. Also, chilling the cups before serving further solidifies the texture and prevents sogginess.
Can I double the recipe to make more cups?
Definitely! This recipe scales up nicely. Just be sure you have enough muffin liners and a large enough baking dish. Adjust baking time slightly if necessary, but generally it stays about the same since each cup is the same size.
Final Thoughts
Making Oreo Cheesecake Cookie Cups is such a rewarding and fun experience because you end up with a dessert that tastes as if it took hours to craft but comes together in a snap. Whether you are a novice baker or a dessert pro, these little cups of joy will impress anyone lucky enough to have one. Go ahead and give them a try—you might just find your new go-to sweet treat!
PrintOreo Cheesecake Cookie Cups Recipe
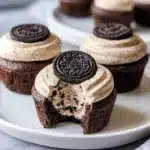
These Oreo Cheesecake Cookie Cups combine the classic crunch of Oreo cookies with a rich, creamy cheesecake filling into convenient, individual-sized treats. Perfect for parties or a delightful dessert anytime, these no-fuss cookie cups feature a buttery Oreo crust, a smooth cream cheese filling with an optional hint of mini chocolate chips, topped with a swirl of whipped cream and extra Oreo crunch.
- Prep Time: 15 minutes
- Cook Time: 18 minutes
- Total Time: 2 hours 33 minutes
- Yield: 12 servings 1x
- Category: Dessert
- Method: Baking
- Cuisine: American
- Diet: Vegetarian
Ingredients
Crust
- 20 Oreo cookies
- 5 tablespoons unsalted butter, melted
Cheesecake Filling
- 8 oz cream cheese, softened
- 1/2 cup granulated sugar
- 1/4 cup sour cream
- 1/4 cup mini chocolate chips (optional)
Topping
- 1 cup whipped cream
- Additional crushed Oreo cookies for garnish
Instructions
- Preheat Oven: Set your oven to 350°F (175°C) to get it ready for baking the cookie cups.
- Prepare the Crust: Crush 20 Oreo cookies into fine crumbs using a food processor or by hand in a sealed bag. Mix these crumbs with the melted butter until the mixture resembles wet sand.
- Form the Base: Line a muffin tin with cupcake liners. Press approximately one tablespoon of the Oreo mixture firmly into each liner to create an even base layer.
- Make the Cheesecake Filling: In a mixing bowl, beat the softened cream cheese and granulated sugar until the mixture is fluffy and smooth. Add the sour cream and mix again until fully combined. If using, gently fold in the mini chocolate chips.
- Fill the Cups: Spoon the cheesecake filling over the Oreo crust bases, filling the liners nearly to the top but leaving a little space.
- Bake: Place in the preheated oven and bake for 15-18 minutes until the filling is set yet still slightly jiggly in the center, indicating a creamy texture.
- Cool and Chill: Allow the cups to cool completely to room temperature, then refrigerate for at least 2 hours to firm up the cheesecake filling.
- Add Toppings: Just before serving, top each cheesecake cup with a dollop of whipped cream and sprinkle with additional crushed Oreo cookie crumbs for extra texture and flavor.
Notes
- For a firmer crust, chill the Oreo crumb mixture before pressing into the liners.
- You can substitute mini chocolate chips with chocolate chunks or omit them entirely for a classic flavor.
- To avoid cracking, do not overbake the cheesecake filling; it should remain slightly jiggly when removed from the oven.
- Store leftover cheesecake cups in the refrigerator for up to 3 days.
- This recipe can be doubled easily by using two muffin tins.
Nutrition
- Serving Size: 1 cookie cup (approx. 85g)
- Calories: 280 kcal
- Sugar: 20 g
- Sodium: 180 mg
- Fat: 18 g
- Saturated Fat: 9 g
- Unsaturated Fat: 7 g
- Trans Fat: 0 g
- Carbohydrates: 26 g
- Fiber: 1 g
- Protein: 4 g
- Cholesterol: 40 mg
Keywords: Oreo cheesecake, cookie cups, no-bake crust, mini desserts, party treats, chocolate chip cheesecake