Red Velvet Cakesicles Recipe
Introduction
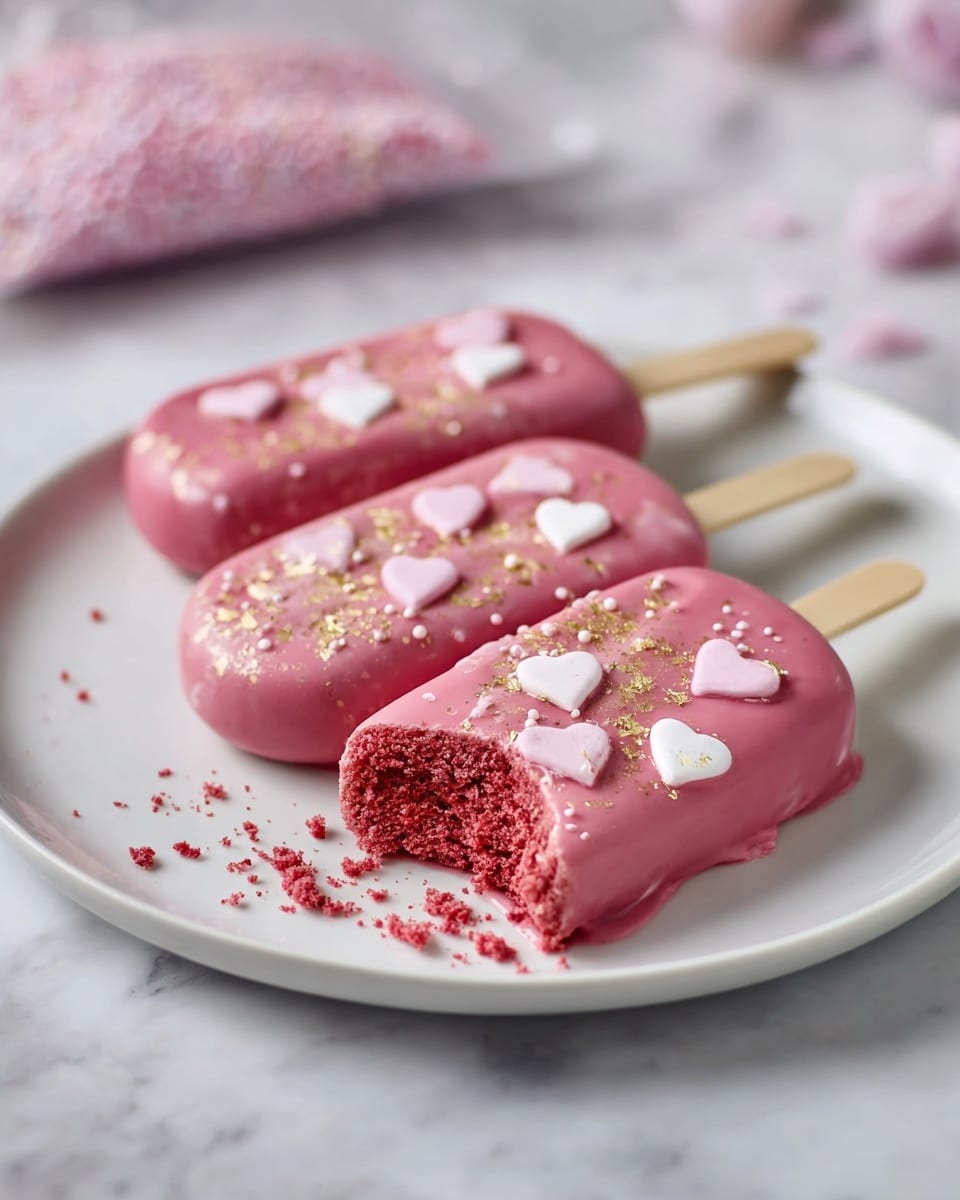
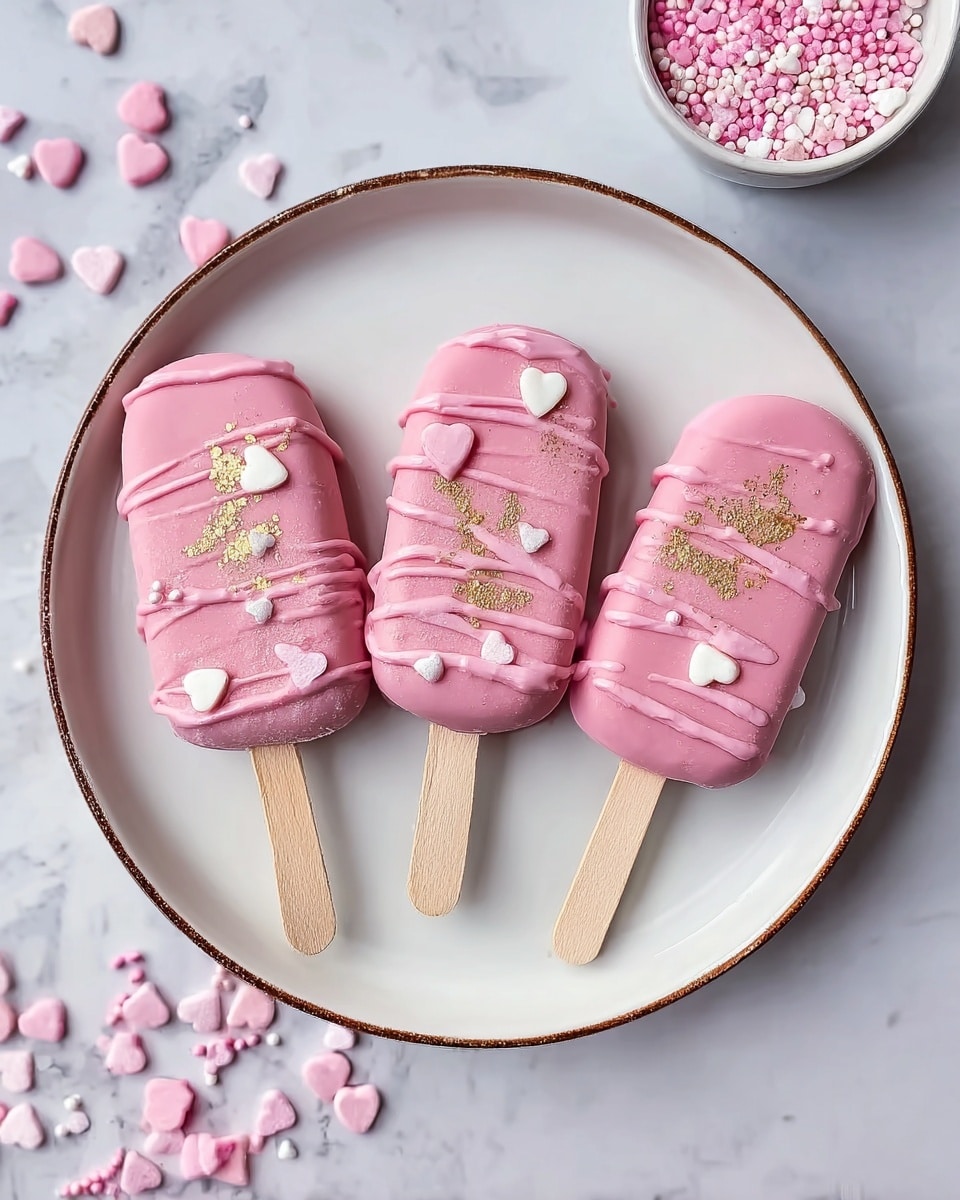
These Red Velvet Cakesicles are a fun and elegant twist on classic cake pops. Moist red velvet cake combined with creamy frosting, coated in smooth chocolate, makes for a delightful treat perfect for any occasion.
Ingredients
- 150 g All-purpose Flour
- 200 g Granulated Sugar
- 1 tbsp Cocoa Powder
- 1 tsp Salt
- 1 tsp Baking Soda
- 1 Egg
- 164 g Vegetable Oil (approx. 180ml)
- 120 g Buttermilk (approx. 120ml)
- 1 tbsp White Wine Vinegar
- 1 tsp Vanilla Extract (for batter)
- ½ tsp Red Gel Food Colour
- 113 g Cream Cheese (room temperature)
- 75 g Unsalted Butter (room temperature)
- 480 g Powdered Sugar
- 1 tsp Vanilla Extract (for frosting)
- 250 g Candy Melts or Chocolate
- Sprinkles (optional, for decoration)
Instructions
- Step 1: Preheat your oven to 325°F (170°C) and line a sheet pan with baking paper.
- Step 2: In a bowl, lightly whisk together the egg, buttermilk, vegetable oil, and vanilla extract until well blended.
- Step 3: Add sugar, flour, cocoa powder, and salt to the wet mixture. Mix for about a minute to combine.
- Step 4: Stir in the red gel food coloring until the batter reaches your desired shade of red.
- Step 5: In a small bowl, pour the white wine vinegar over the baking soda, mix quickly, and then add this to the batter. Mix to combine.
- Step 6: Pour the batter into the prepared sheet pan and bake for 20 minutes or until a skewer inserted comes out clean. Let the cake cool completely.
- Step 7: For the frosting, beat together cream cheese and butter until smooth.
- Step 8: Gradually add powdered sugar and vanilla extract, mixing slowly to incorporate.
- Step 9: Increase speed and beat for 2-3 minutes until the frosting is fluffy.
- Step 10: Once the cake is cool, crumble it by rubbing between your fingers into fine crumbs.
- Step 11: Add frosting to the cake crumbs, using about half a cup of frosting for every three cups of crumbs. Mix by hand until the mixture holds shape when rolled into a ball. Adjust frosting if necessary.
- Step 12: Melt candy melts or temper chocolate. Pour some into the cakesicle mold, pushing it up the sides to coat the inside fully.
- Step 13: Turn the mold upside down to remove excess coating. Insert popsicle sticks and chill in the fridge for a few minutes to set.
- Step 14: Remove the mold from the fridge and press the cakesicle mixture into each cavity, pushing some under the sticks. Leave a small gap (1-2mm) at the top without overfilling.
- Step 15: Reheat candy melts or chocolate if needed. Pour a thin layer over the back to seal the cakesicles. Smooth the surface with a palette knife and refrigerate for 10 minutes.
- Step 16: Carefully unmold your cakesicles and decorate with leftover candy melts, sprinkles, or any other toppings you like.
Tips & Variations
- For a more intense red color, add gel food coloring gradually until you get the perfect shade without affecting the batter’s consistency.
- Use white chocolate candy melts for a classic red and white contrast, making decorations pop visually.
- If you don’t have a cakesicle mold, a cake pop mold or even a mini muffin tin with sticks works as a substitute.
- Refrigerate your cakesicle mixture briefly if it feels too soft to help it firm up before molding.
Storage
Store cakesicles in an airtight container in the refrigerator for up to 5 days. Allow them to come to room temperature for about 15 minutes before serving. For longer storage, you can freeze cakesicles wrapped individually for up to 2 months; thaw in the fridge overnight before enjoying.
How to Serve
Serve this delicious recipe with your favorite sides.
FAQs
Can I use regular food coloring instead of gel?
Regular liquid food coloring can be used, but gel food coloring is preferred because it provides a stronger color without thinning the batter.
How do I prevent the cakesicles from cracking after unmolding?
Make sure the chocolate or candy coating is fully set and that you leave a small gap at the top so the filling isn’t pushing against the mold edges. Also, handling the cakesicles gently when removing helps prevent cracks.
PrintRed Velvet Cakesicles Recipe

Delicious and visually stunning Red Velvet Cakesicles combine moist red velvet cake with creamy homemade cream cheese frosting, all encased in a smooth chocolate shell. Perfect for parties or gifting, these bite-sized treats are easy to make using a mold and decorated with sprinkles for a fun, festive look.
- Prep Time: 30 minutes
- Cook Time: 20 minutes
- Total Time: 1 hour
- Yield: Approximately 12 cakesicles 1x
- Category: Dessert
- Method: Baking
- Cuisine: American
Ingredients
For the Red Velvet Cake
- 150 g All-purpose Flour
- 200 g Granulated Sugar
- 1 tbsp Cocoa Powder
- 1 tsp Salt
- 1 tsp Baking Soda
- 1 Egg
- 164 g Vegetable Oil (about 180 ml)
- 120 g Buttermilk (120 ml)
- 1 tbsp White Wine Vinegar
- 1 tsp Vanilla Extract
- ½ tsp Red Gel Food Colour
For the Cream Cheese Frosting
- 113 g Cream Cheese (room temperature)
- 75 g Unsalted Butter (room temperature)
- 480 g Powdered Sugar
- 1 tsp Vanilla Extract
For Assembly
- 250 g Candy Melts OR Chocolate
- Sprinkles (for decoration)
Instructions
- Make the Red Velvet Cake: Preheat your oven to 325°F (170°C) and line a sheet pan with baking paper. In a bowl, lightly whisk the egg, buttermilk, vegetable oil, and vanilla extract until blended smoothly.
- Combine dry ingredients: Add the granulated sugar, all-purpose flour, cocoa powder, and salt to the wet mixture and mix for about a minute until well incorporated.
- Add food coloring and leavening reaction: Mix in the red gel food coloring until the batter reaches your desired shade of red. In a small bowl, quickly mix white wine vinegar and baking soda; pour this mixture into the batter and stir thoroughly to activate the rising agents.
- Bake the cake: Pour the batter into the prepared sheet pan and bake for 20 minutes or until a skewer inserted comes out clean. Remove from the oven and allow to cool completely.
- Prepare the cream cheese frosting: Using a mixer, cream together room-temperature cream cheese and unsalted butter until smooth. Gradually add powdered sugar and vanilla extract, mixing on low speed until incorporated, then increase to high speed and beat for 2-3 minutes until the frosting is fluffy.
- Create cake crumbs and mix with frosting: Rub the cooled cake with your fingers until it forms fine crumbs. Combine the crumbs with about half a cup of frosting per 3 cups of crumbs, mixing with your hands until the mixture holds shape in a ball without being too wet or dry. Adjust frosting quantity accordingly.
- Melt chocolate coating: Melt candy melts or chocolate in a microwave-safe bowl, reheating in short bursts and stirring until smooth.
- Coat molds with chocolate: Pour the melted chocolate into the cakesicle molds, pushing it up the sides to coat the entire interior. Invert the mold over the bowl to discard excess chocolate, then insert popsicle sticks into the molds. Refrigerate for a few minutes to set.
- Fill molds with cake mixture: Once set, gently press the cake and frosting mixture into the molds, ensuring you fill all cavities and push some mixture underneath the sticks. Avoid overfilling; leave about 1-2 mm gap at the top.
- Seal the cakesicles: Reheat any remaining melted chocolate if necessary, and pour a thin layer over the back of the cakesicles to seal them. Use a palette knife to smooth the backs and remove excess chocolate. Return to the fridge for 10 minutes to set.
- Unmold and decorate: Carefully remove the cakesicles from the molds and decorate with leftover melted chocolate, sprinkles, edible glitter, or other decorations as desired. Serve chilled or at room temperature.
Notes
- You can substitute buttermilk with regular milk plus a teaspoon of lemon juice or vinegar if needed.
- Room temperature ingredients (cream cheese, butter, egg) help achieve a smoother batter and frosting.
- Ensure cake is fully cooled before creating crumbs for best texture in cakesicles.
- Tempering chocolate is ideal but not mandatory; just avoid overheating to prevent burning.
- For easier unmolding, lightly grease molds or use silicone molds designed for cakesicles.
- Store leftovers in an airtight container in the refrigerator for up to 5 days.
Keywords: Red Velvet Cakesicles, Red Velvet Cake Pops, Cream Cheese Frosting Cakesicles, Chocolate Coated Cakesicles, Party Desserts